Playing sequences of chords, particularly when they’re faster, can often be a stumbling block for younger or less advanced pianists. In this post, I’m going to share with you an approach to chord-playing that I think helps, mainly by clarifying the issue and thereby giving us a way into teaching and practicing chords in a more focused and productive way.
Beginner pianists will most likely first encounter chords in some sort of left-hand accompaniment, and they will probably be triads at most. (While I like, for instance, LCME’s distinction between triads and chords, here I’m using the term ‘chord’ to refer to the simultaneous playing of any combination of more than two notes. The approach I describe here does also have a corollary benefit for double notes playing, by the way, but as that is a different and usually more advanced technical issue, I’ll leave it for another time.)
Although broken chords receive relatively short shrift in the UK’s graded syllabuses—less than their usefulness merits, for sure—they are there, and serve as a useful demonstration of the theoretical concept of chordal inversion, and also of the concept I want to outline here.
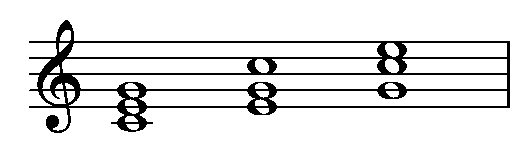
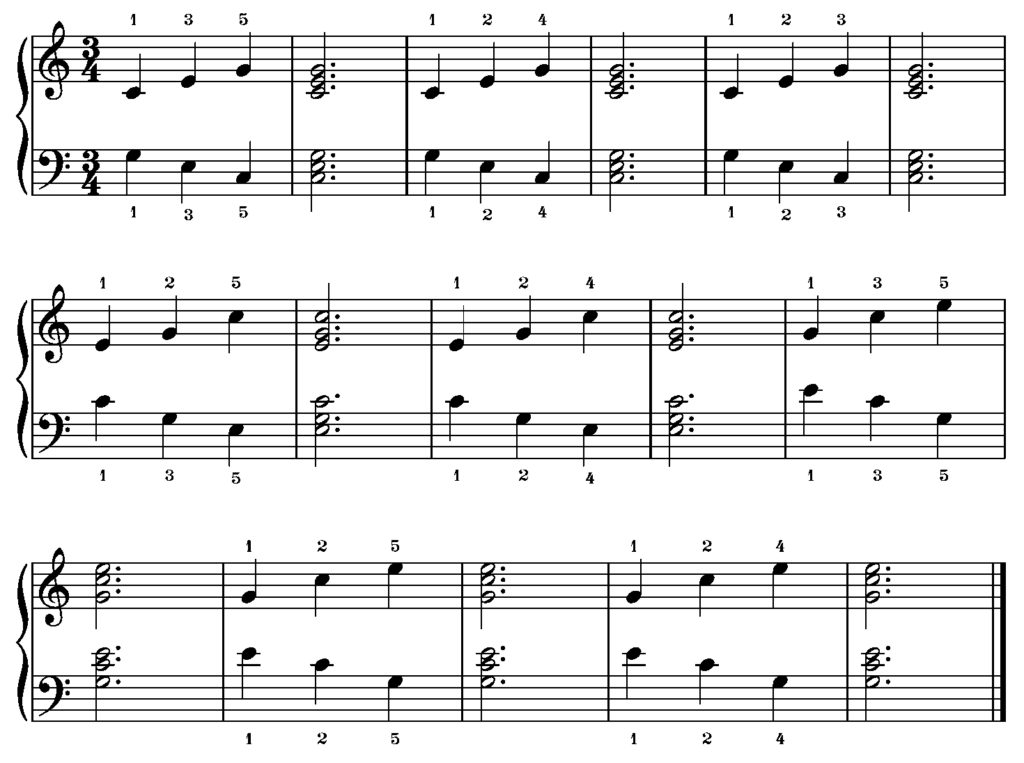
Now, when most beginners encounter a Grade-1-style broken chords exercise it will be something like this:

but the first time they attempt it, it will usually come out more like this:

In this case, I would say that the student has grasped the change of position, but not the change of shape.
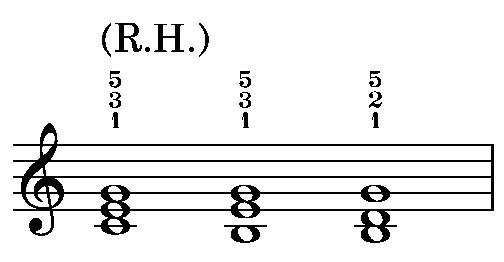
Let’s make these definitions precise, because precision is, after all, the reason for this article. By ‘shape’ I mean the placing of the fingers on adjacent or non-adjacent keys according to the notes that must be played. So, example 3 presents the three basic triadic shapes that the exercise in example 1 requires: namely, a triad in root position, one in first inversion, and one in second inversion.
Now, the fingerings that might be chosen for this exercise can vary according to the size and flexibility of the hand. Obviously, everyone can move the thumb away from and towards the four fingers; but the fingers can themselves be moved away from one another. This slightly more personally-determined facility that is the deciding factor when it comes to choosing chord fingerings. A basic technical principle should always be to avoid discomfort and awkwardness, because it either introduces or results from tension, which can cause injury. So we should aim to avoid ‘splaying’ the fingers at all times. (It might be argued that it is sometimes unavoidable, but if the music is well written I’d say those occasions are actually very few and far between.)
So, to return to our three chord shapes, an ideal fingering for a small hand might be:
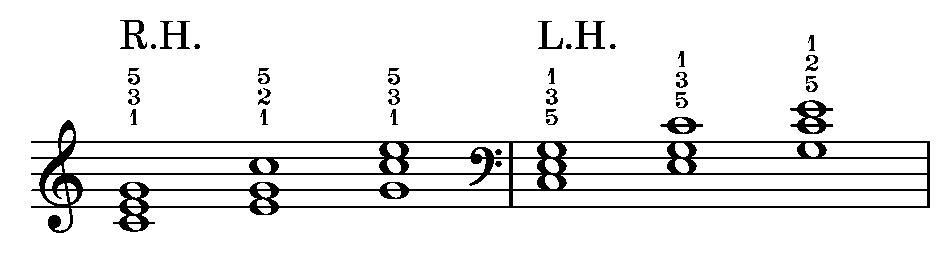
A larger hand might prefer:

and in some musical contexts this might be a better choice for a small hand too.
Now, in both of these cases, what is important to note for my approach is that the ‘shape’ is changing because different combinations of fingers are active. So example 6 is also a change of shape.
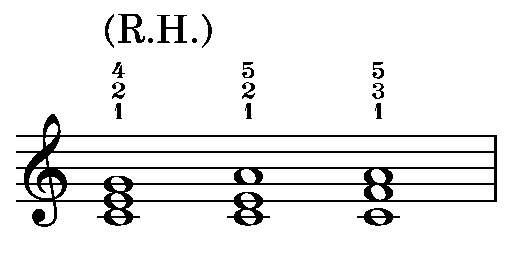
By ‘position’, I am referring to the placement of the hand on the keyboard. So, in example 6, there is no change of ‘position’ because the thumb remains on the same key throughout. Likewise in example 7 (below), where, although the thumb now moves, the fifth finger remains fixed on G. For a ‘position’-change to occur, both sides of the hand, thumb and fifth finger, must move to different keys. Example 2, then, features a chain of ‘position’-changes, without the change of ‘shape’ also required by the exercise shown in example 1.
Now, there are several points to make. Chords and broken chords are best trained together. Although different techniques are required, the most fundamental concept to grasp is, I believe, that of ‘shape’, because this is the basis of accuracy—the fingers instinctively find the spatial relationships between the keys required. Movement around the keyboard can be introduced more successfully once chord shapes have been securely grasped.
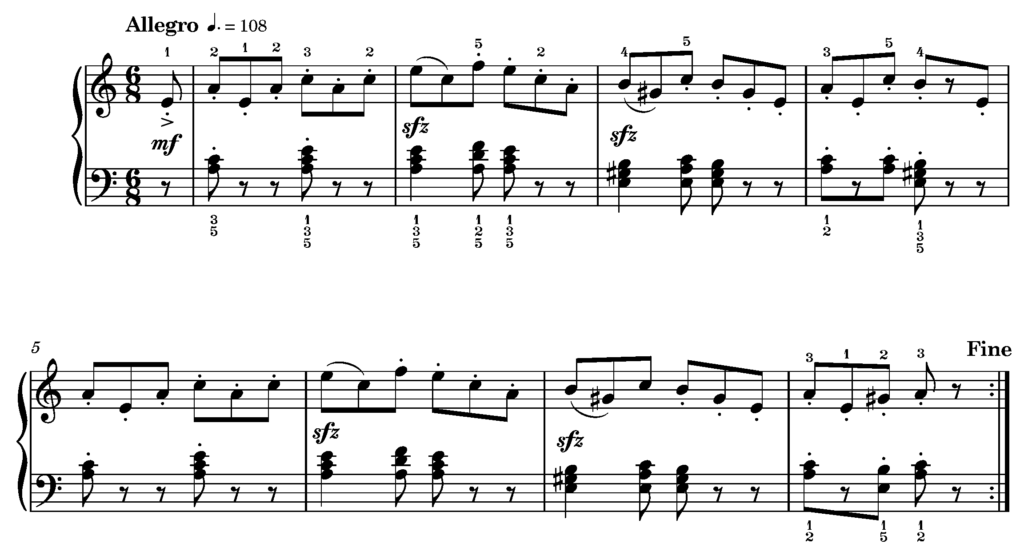
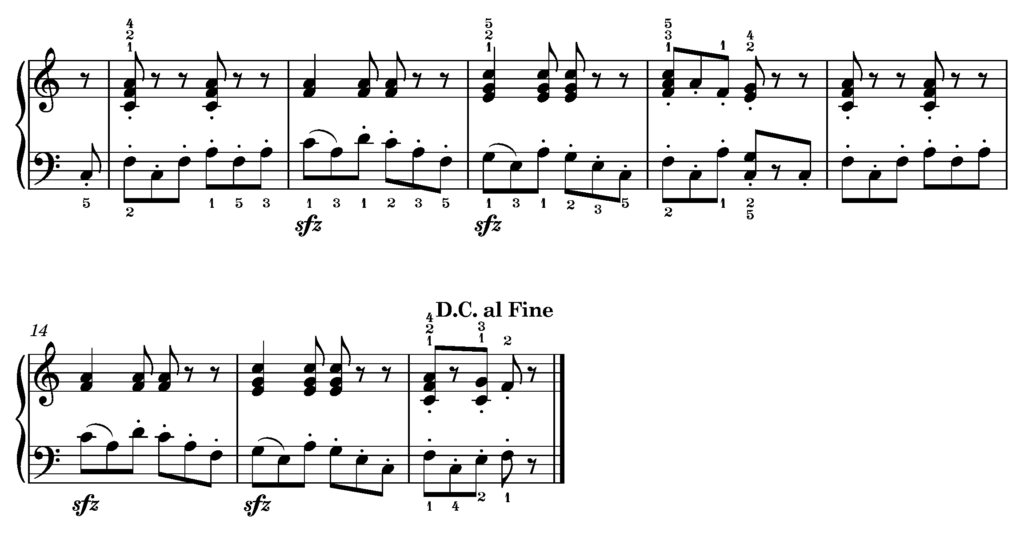
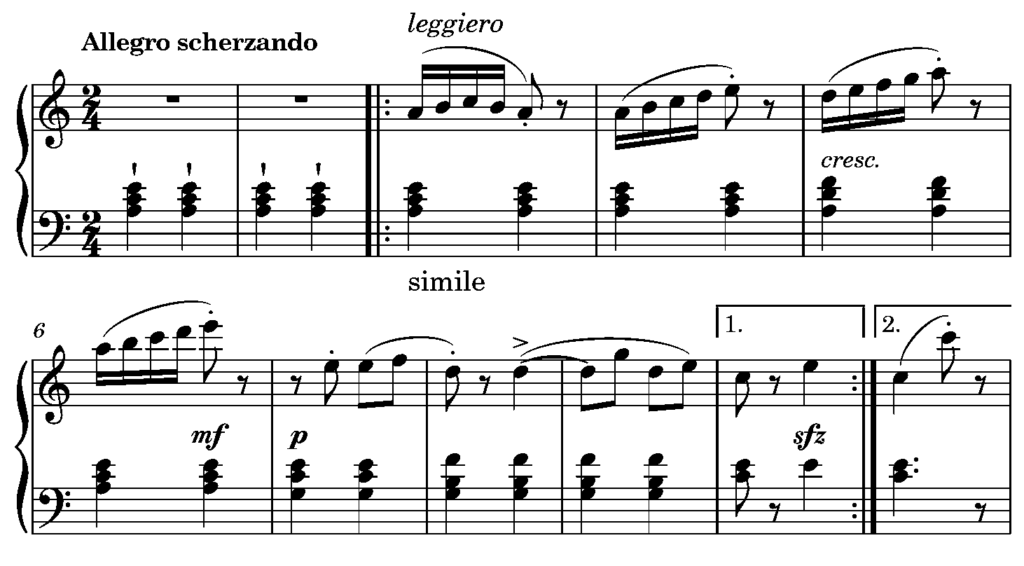
Let’s look at this in practice, using Schumann’s ‘Wilder Reiter’, from Album für die Jugend, op. 68, as an example. Here, the melodic aspect of the piece mainly consists of broken chords, while the accompaniment is block chords. As I hope to show, the two hands actually move almost in parallel, which makes this an excellent study for chord- and broken-chord-playing, and a superbly clear demonstration of the difference between ‘shape’ and ‘position’.
The A section (this piece is in ternary form) consists of two four-bar phrases, the first three bars of each being identical. The final bar of the first phrase describes an imperfect cadence; this is balanced by the final bar of the second phrase, which describes a perfect cadence.
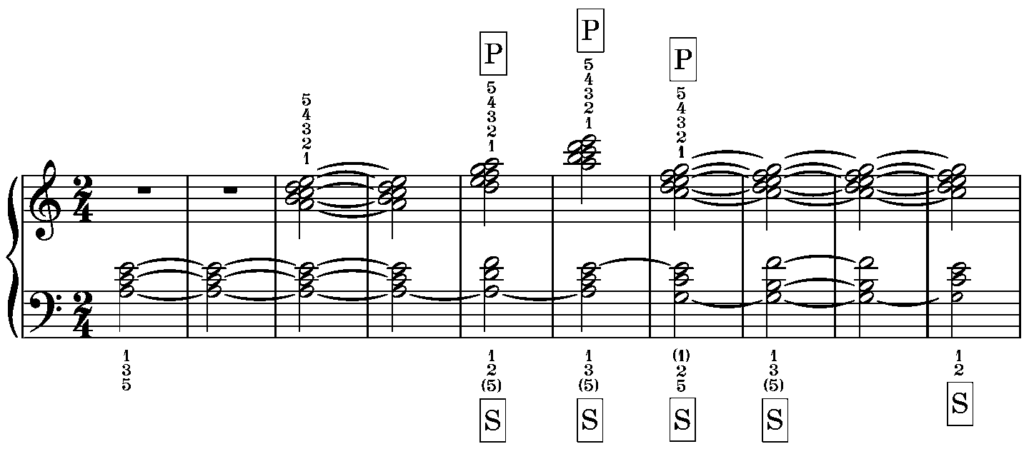
As the breakdown of the first phrase in example 9 (below) shows, both hands move in parallel through i-ivc-i and V-ic-V progressions in bars 2 and 3 respectively. While the right hand in bars 0-2 outlines ic-i in broken chords, the left hand remains on a tonic chord in root position. (The omission of the fifth from the first chord is a pragmatic concession to avoid alternations between the right hand and left hand thumbs.) While we could imagine the left-hand chord to be hypothetically in second inversion, which would in fact result in both hands moving in parallel, the left hand would need to move into root position on the second beat of bar 1, a quaver before the right hand, so this muddies the waters more than it helps. (As a purely compositional observation, however, I feel that it is still worth making.) Changes of position and shape are marked.

This gives us a left hand that remains on a root position tonic triad for the first two bars, while the right-hand ascends through broken tonic triads in second inversion and root position. The brief left-hand shift to a second inversion subdominant chord in bar 2 is a change of shape only (as the fifth finger remains on A). It can be seen, then, that the left-hand has two changes of shape—i-ivc, and V-ic—and one position shift—downwards from i to V. The right hand is identical but for an initial ic-i position shift.
Of course, if we had two right hands, or two left hands, this situation would be simpler! What makes it more complex, and what makes the approach I’m outlining here so helpful, is that parallel motion actually involves the hands playing in mirror image. The significance of this for chord-playing is that in each hand the space between thumb and index finger—both the wider span between adjacent digits and the most mobile when it comes to changes of shape—are at opposite ends of the chord. To see this problem in action, try playing the right hand’s music with both hands an octave apart. The right and left hands really must employ different fingering solutions.
I would strongly recommend that the right hand practices substituting a broken chord fingering of 1-2-4 for the conventional 1-3-5 for root position and second inversion. (This is less valuable for first inversion until or unless the player’s hand is large enough to span four keys between fingers 2 and 4 without strain.) Not only is this valuable preparation for four-note broken chords, but it also prepares a reflex solution for phrases that feature a broken chord that concludes upwards, rather than falling to a note within the span of the broken chord (in which circumstance, finger 5 is the better solution for the top note of the broken chord.) The equivalent for the left hand would be to take root position and first inversion with 4-2-1 instead of 5-3-1. The exercise shown in example 10 (below) shows how we might train these changes of shape and position.
The most awkward moment is, in my opinion, the left hand in bars 9-10. The shape-change here (there’s no position change if the little finger remains on the F) is from a triad, fingered 5-3-1, to a sixth-chord, fingered 5-3-2-1. There are two separate issues to master: replacing the thumb on C with the index finger, and moving the thumb upwards from C to D. Now, I don’t believe it’s ever too early to develop lateral mobility in the thumbs. Most early training emphasises thumb-passing, but at speed attempting a bound-legato movement around the thumb is actually restrictive. After all, lightness and rapidity in the thumbs are essential for more advanced works, such as Chopin’s Etude in G-flat, op. 25 no. 9, or ‘Reconnaissance’ from Schumann’s Carnaval, op. 9, and a heavy-feeling thumb can also inhibit rapid octave-playing.
Before we get distracted by other technical matters, though, let’s get back to the issue of fingering for chords and broken chords! This lies at the heart of my shape/position approach, because a well-chosen fingering will promote fluidity of movement, but will also reduce unnecessary movement—be that a reorganisation of fingers on the keys (change of shape) or repositioning of the hand on the keyboard (change of position). The benefit of this distinction between shape and position is that it easily enables more focus on the actual demands of the music. A shape-change is a micro-movement; a position-change a macro-movement. Micro-movements involve abductors and adductors in the hand; macro-movements involve the wrist and/or forearm, depending on the size of the required displacement of the hand.
This is why things like the staccato C major scale in 6ths in the ABRSM Grade 6 syllabus pose problems. This scale is essentially a wrist-staccato exercise, a preparation for scales in octaves (which themselves never actually make it into the syllabus!) To execute the scale evenly and cleanly, the fingers must hold the sixth shape, while a light vertical bounce of the hand from the wrist coincides with a smooth horizontal movement up and down the keyboard, initiated mainly by abduction of the upper arm. It’s a continuous sequence of stepwise changes of position. The same is true, of course, of octaves, but the wider span requires more strength across the hand to hold the shape, and as a result there is an increased risk of clenching in the wrist. This means that as the wrist tightens the forearm has to take over the vertical movement, and because the forearm is a much larger lever, it’s much less likely that the stepwise motion will be executed successfully.
So, while it doesn’t necessarily resolve issues of mechanics, many of the problems of moving around the keyboard can be simplified, if not solved altogether, by thinking in terms of the difference between shape and position. Another benefit is worth mentioning, too. Let’s look at the opening of another popular beginners’ piece, ‘Arabesque’, no. 2 from Friedrich Burgmüller’s Études faciles et progressives, op. 100.
Now, let’s look at the breakdown of the chordal outline of this section. Again, position- and shape-changes are marked, along with what I consider to be the most practical fingering.
What this shows us is that the right hand consists entirely of close five-finger shapes, the only adjustments are changes of position. The left hand, conversely, consists entirely of shape-changes between triads in root position, first and second inversions, and one seventh chord. Glance through any collection of elementary or intermediate repertoire, and you will see similar shapes and patterns—and, of course, the majority of even advanced Classical repertoire! You will probably have noticed the very similar left-hand patterns in both the Schumann and Burgmüller extracts above. This is no accident; and while not all the pieces that early-stage students will encounter will be quite so similar, or indeed quite so straightforward in their keyboard choreography, I believe there is enormous advantage to inculcating as soon as possible this approach. Firstly, seeing the chordal patterns that underpin melodies and their accompaniments; and secondly, thinking of the fingerings that these chordal patterns require in terms of hand-shape and keyboard-position. Students often struggle because they see what we might call the music’s ‘face’. Faces are fairly distinctive. Skulls are far harder to tell apart. Recognising the ‘skeletal’ features of the pieces we learn—thinking in terms of the music’s bones, not being distracted by the soft tissue—helps us learn faster.